Getting Started
Overview
What is Gradle?
Gradle is a build system. Most of the time you will use it to build a target library or application.
Gradle, when run, looks for a build.gradle file in the
current directory. A working build.gradle is included here
for reference, but don’t worry about understanding it for
now. We’ll make more sense of it later.
apply plugin: 'java'

repositories {
  mavenCentral()
}

dependencies {
  compile 'com.google.guava:guava:19.0'
  testCompile 'junit:junit:4.12'
}
Gradle scripts are programs
Though at first glance a simple build.gradle file may look
like a bunch of data values, you are actually reading
code, written in Groovy. If you
wanted, you could add variable declarations, print
statements, and all sorts of other logic throughout the
script above. Groovy’s flexible syntax allows writing
code that has a declaritive, data-like look and feel to
it.
You can think of Gradle as a framework designed to do
all sorts of heavy lifting for your project. It can handle managing dependencies, collecting
input files, compiling code, and much more. In
short, this means you can ask someone to clone your
project and then type gradle compileJava, and Gradle
will do a whole bunch of magic to produce an output. For
example, Gradle might download libraries from an online
repository and copy intermediate files around before,
say, generating an executable.
Why Gradle?
Gradle has been growing in popularity as a build system for a couple of reasons.
It is JVM based, which means the one prerequisite is that you have to install Java before using it. And that’s it. If you are working on a Java project, you are already ready to go.
It is a fully featured programming language. Gradle provides a flexibility that can be refreshing for projects with non-standard build steps. Compare this with its predecessor Ant, a build system driven by static xml files, where running into a wall means writing and registering a custom plugin with their system. With Gradle, such issues can be worked around with a few lines added to a build script.
It is cross platform. The importance of this can’t be overstated. Gradle has a solid story on Windows.
It is extensible via a rich, powerful plugin system. A plugin for managing Java projects is included out of the box, as are quite a few other standard plugins if you’re curious.
And finally, Android has officially endorsed Gradle as the recommended build system for building Android apps. The Android gradle plugin does a lot of work to hide much of the complexity that can normally creep up when you start buliding lots of different versions of your Android app.
Official documentation
Gradle’s official documentation can be found here, and you should bookmark that link in case you need to deep dive into any Gradle feature later. However, I feel that it can come across an intimidating tome of information that doesn’t even have you writing your first build script until Chapter 44.
When I’m learning, I want to see simple, contained, concrete, realistic examples. I want to tweak settings and see what happens. That’s exactly what I’ll provide in this guide, and I hope this series acts as a useful supplement to the official materials.
The Basics
Gradlew
Instead of running gradle directly, you will
almost always run gradlew instead.
gradlew is
short for “gradle wrapper”, because it wraps an inner
copy of gradle,
offering indirect access to it. You can think of
gradlew as being a
snapshot of a particular gradle instance. Whereas
gradle would be
installed somewhere generically on your system (like
/usr/local/bin), gradlew should be dropped into
the project’s root directory (and checked into source
control).
If you have gradle installed on your
system, you can instantiate a gradle wrapper in
the current directory by typing gradle wrapper:
$ ./gradlew -v
./gradlew: No such file or directory

$ gradle wrapper --gradle-version 2.0
... stuff happens ...

$ ./gradlew -v
------------------------------------------------------------
Gradle 2.0
------------------------------------------------------------By running gradlew, you can be sure
you’re running the gradle version that the
original author tested against. This is important as
newer major versions of gradle may break backwards
compatibility (or have different default behavior that
may also affect the build). It also means a user can
build your project even if they never installed
gradle
themselves.
I will start refering to gradlew for the rest of this
series, but remember that conceptually gradlew is just gradle and accepts the same
inputs.
Tasks
gradlew, when
run, reads the current folder’s build script (if any) and
prints out a list of tasks to the console.
A task is a named, isolated unit of work which is one part of the overall build. Additionally, a task can depend on other tasks (meaning those tasks should run first). In this way, simple tasks chain together to perform complex logic.
A concrete example will help illustrate this. Here are
a subset of the tasks that might be listed when you run
gradlew tasks on a
configured Java project:
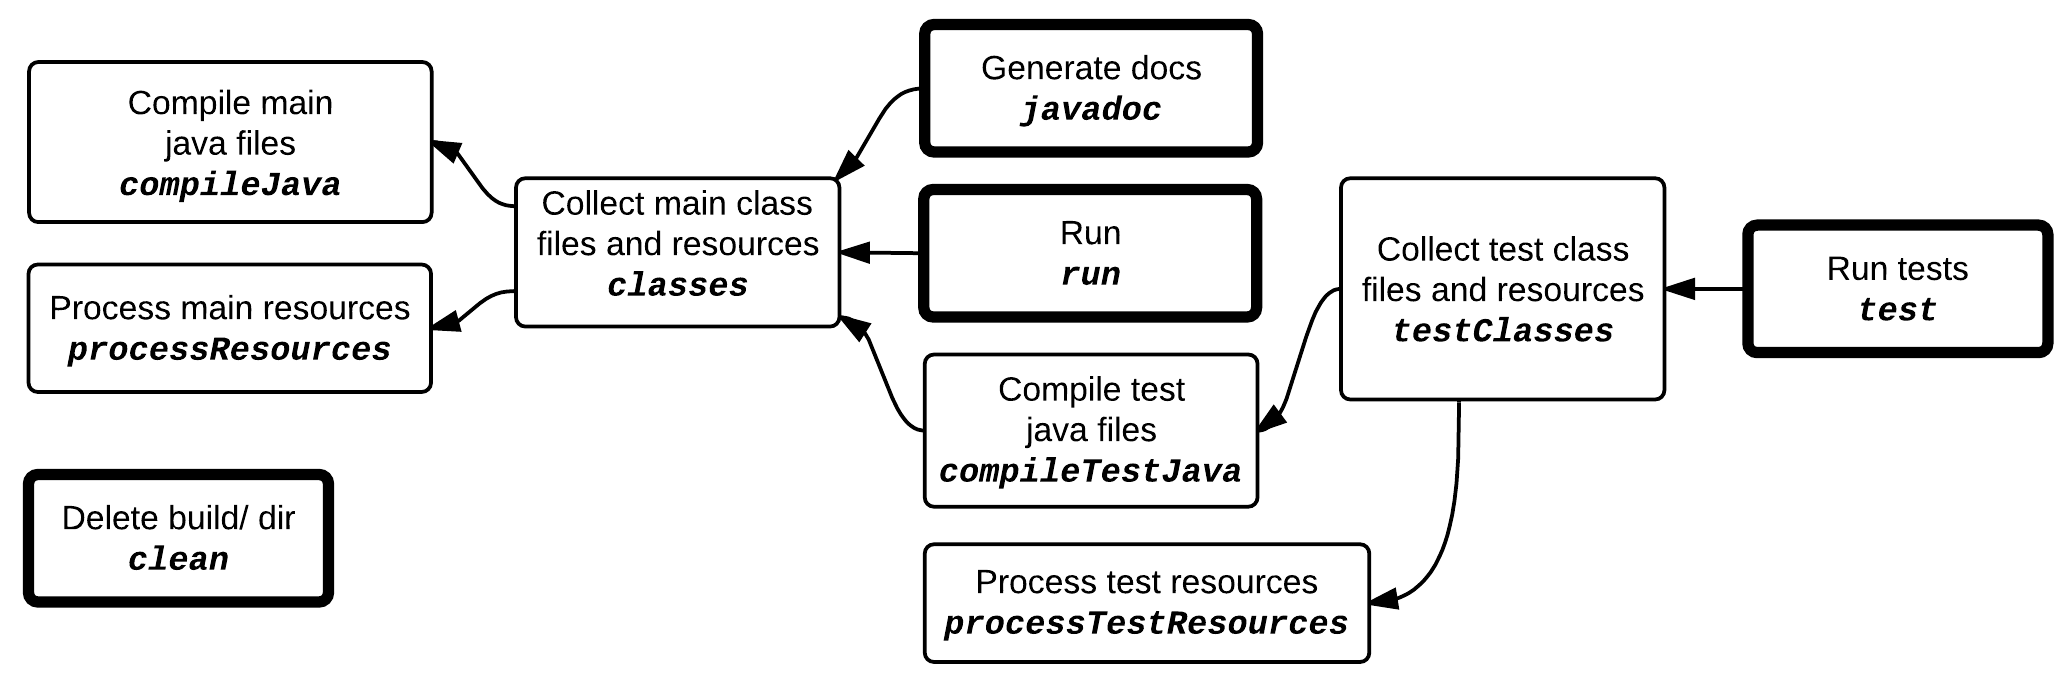
Each box above represents a task (description + task name). Tasks without any other tasks depending on them are emphasized with a bold outline for clarity, but otherwise there is nothing technically special about them.
Running gradlew
<task_name> will run that task, as well as
any prerequisite tasks. In practice, you probably won’t
run intermediate tasks directly. But you can if the need
arises.
So in the above example, gradlew clean is a standalone
task that simply deletes the contents of a build
directory. gradlew
run, on the other hand, will compile code, process
resources, package everything together, and then run the
application. gradlew
javadoc and gradlew run rely on a bunch of
the same tasks, so calling one and then the other will
share a lot of the work from the previous call.
Tasks are defined by declaring them with the
task keyword and
setting them to a block with the
left-shift operator:
apply plugin: 'java'

task run << {
  ant.java(jar: '/path/to/app.jar', fork:true)
}Dependency management
So, you want to compile your Java project. However, it depends on some library that, in turn, depends on another.
One of the main jobs of a build system is to automatically manage these sorts of dependency relationships for you, and of course Gradle is no exception.
You can think of dependency management consisting of three parts:
- dependencies
- configurations
- repositories
Dependencies
A dependency is pretty straightforward: it’s whatever your project relies on to compile or run. This is often a jar. To get this jar, you may download it from a server, find it on disk, or compile another gradle project on demand to produce it.
When you specify a dependency, you must associate it with an existing configuration.
Configurations
A configuration is a group of related dependencies. For example, a fancy graphing calculator application you’re writing may depend on a math library and a graphics library, while your unit tests may additionally depend on a testing library and a profiling library. In this case, you would specify a main configuration (math+graphics) and a test configuration (testing+profiling).
Note that the test configuration builds upon the main configuration. If you want to compile your unit tests, you must also compile the project itself. As you might expect, then, configurations can inherit from other configurations.
Configurations are often created behind the scenes for
you and you may never need to declare your own. For
example, the Java plugin provides compile, runtime, testCompile, and testRuntime configurations,
with the following inheritance rules:
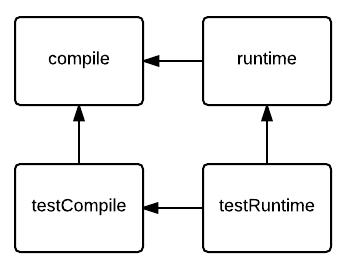
compile- dependencies needed when you compile your applicationtestCompile- dependencies needed when you compile your application’s unit testsruntime- dependencies your code doesn’t compile against but will need when running. For example: a jar of theme-dependant icons, classes accessed through reflection, or a bundled executable that should be run by your applicationtestRuntime- same as “runtime” but only used by unit tests
Repositories
A repository is a large collection of dependencies. Think of it like a dragon’s hoard of treasure and gold. When you need to find a specific version of a specific dependency, you can root around inside a repository to look for one. Whereas a project would only reference a single version of a library at a time, a repository may store all versions of the library that ever existed.
It’s usually good enough to specify mavenCentral as your sole
repository (which directs to https://repo1.maven.org/maven2).
jcenter is another
common choice. You can even specify both repositories,
and they will be searched in the order you listed
them.
It can even make sense for you to own a small, local repository with a handful of dependencies that you maintain yourself. For example, you might iterate on some library under development, hosting it locally until you’re satisfied it’s ready for release.
Tying it all together
Let’s revisit the example from the beginning as it should make more sense now.
apply plugin: 'java'

repositories {
  mavenCentral()
}

dependencies {
  compile 'com.google.guava:guava:19.0'
  testCompile 'junit:junit:4.12'
}
Here, we are adding a single dependency, Guava v19.0,
to the compile
configuration, and another dependency, JUnit v4.12, to
the testCompile
configuration. The first time you ask Gradle to compile
the project, it will download any missing dependnecies
from Maven Central.
Strings
Groovy, and by extension Gradle, makes a subtle distinction between ‘single quotes’ and “double quotes”. Double quoted strings are evaluated when they are read, and can contain code expressions that will be resolved at runtime. Single quoted strings, in contrast, are static. What you see is what you get.
println "5 + 5 = ${5 + 5}" // 5 + 5 = 10
println '5 + 5 = ${5 + 5}' // 5 + 5 = ${5 + 5}
You can think of double-quoted strings as a very convenient, concise way to represent Java’s String.format(text, args…) method call.
System.out.println(String.format("5 + 5 = %s", 5 + 5));When writing Gradle scripts, it’s a good idea to use single quotes if your text is static and double quotes if your text is dynamic. At the very least, it’s important to know there’s a difference.
Variables
In Gradle scripts, you will commonly run across two types of variables: the standard kind (local variables) and a dynamic kind (extra properties).
Local variables
Local variables are declared normally just like any
local variable you’d define in Java, such as String name or File srcPath. You can also (and often should) use the
def keyword which
will let the compiler figure out the type for you,
and I do this in the example below.
def root = System.getenv('PROJECT_ROOT')
// Equivalent to:
// String root = System.getenv('PROJECT_ROOT')

if (root == null) {
  throw new RuntimeException("You must define PROJECT_ROOT!")
}

def src = file("$root/assets/nightly/")
def dst = file("$root/dev/game/assets/")
if (dst.exists() && dst.list().length > 0) {
  println "Target dir $dst is not empty..."
  println "Consider running cleanDest task"
}

task cleanDest << {
  delete "$dst/"
}

task copyFiles(type: Copy) {
  from "$src"
  into "$dst"
}
Extra properties
Local variables are useful for storing intermediate values as part of a function. Often, though, you just want to set a value in one place that you want to read back somewhere else.
Gradle provides a way to do this through extra
properties - using the ext keyword, you can
dynamically define variables that are then associated
with the object at the current scope it is being defined
in. Anywhere else in the same scope, you can later read
that variable out again (without needing to use the
ext keyword at
that point).
ext {
    notifyEmails = ['adam@example.com', 'betty@example.com']
}

task sendEmails << {
    notifyEmails.each { email ->
        println "Sending email to: $email..."
    }
}
The above sample works but is admittedly limited. However, extra properties can play a useful role especially when you write build scripts that spans across multiple projects.
You should be aware that I’m glossing over this
feature since we’re just focusing on the basics for now.
Explaining the details of Gradle scopes would require a
decent tangent, and you may never need to really
understand them to get by. At this point, it’s just good
to be aware of extra properties because you’ll often see
the ext keyword
used in practice.
Buildscript block
Normally a Gradle script is read from top to bottom,
but an exception to that is the buildscript block, which is
always executed before everything else. You can think of
it as a script within your script - Gradle will run over
your code in two passes, first running the buildscript block, and next
running everything else.
Why is this important? Well, it turns out it’s very useful for fetching custom plugins.
For example, although the Java plugin is bundled with Gradle, the Android plugin is not. You could always make it a requirement for the user to download just the right version of the Android plugin before building their code, but this is something Gradle is already really great at doing! There should be some way to lean on Gradle to do this for us…
And indeed, that’s what the buildscript block is for.
buildscript {
  repositories {
    jcenter()
  }
  dependencies {
    classpath 'com.android.tools.build:gradle:1.0.1'
  }
}

apply plugin: 'com.android.application'
Notice that the buildscript block
automatically introduces a classpath configuration. Read
the note below if you’re curious to know more, but
otherwise just use this configuration to specify
dependencies needed by any plugins you want to use.
gradlew is called! The buildblock's
classpath is actually providing dependencies for the
rest of your build script.
Key Takeaways
At this point, you should be able to make a good first stab at reading basic Gradle scripts out in the wild. We’ve still got more to cover, but you now have a decent foundation. To reiterate what we’ve covered so far:
- Gradle is used for building libraries and applications
- Gradle uses the Groovy language
- You’ll often invoke Gradle indirectly using
gradlew, the “Gradle Wrapper” - Gradle breaks a build up into tasks, and you can invoke tasks directly
- A configuration is a collection of dependencies
- The Java plugin includes useful configurations and build tasks that use them
- There are two types of variables: local variables
(declared with
def) and extra properties (declared withext) buildscriptblocks run before everything else and provide dependencies for the rest of your build script